Migrating From Access to Postgres
- Download Bullzip Access to Postgres converter:
- http://www.bullzip.com/products/a2p/info.php
- Click on
'Download' in the top-right corner of the page
- Find 'Access To PostgreSQL' and click the 'Download' link on that row.
- The above link will download the latest version at the time of this writing (Oct 2017).
- Unzip the downloaded zip file (something like msa2pgs_5_5_0_280.zip) to get the enclosed .exe
- Run the install .exe
- If asked 'Do you want to run this file?' say 'Run'
- Read and accept the agreement
- Select an install location (or accept the default) and press 'Next >'
- Default: C:\Program Files (x86)\Bullzip\MS Access to PostgreSQL
- Choose if you'd like to create a Start Menu folder (if you don't, you'll need to remember where you installed it)
- Choose if you'd like a Desktop or Quick Launch icon created
- Finally, click 'Install'
 'Download' in the top-right corner of the page
- Click 'Next >'
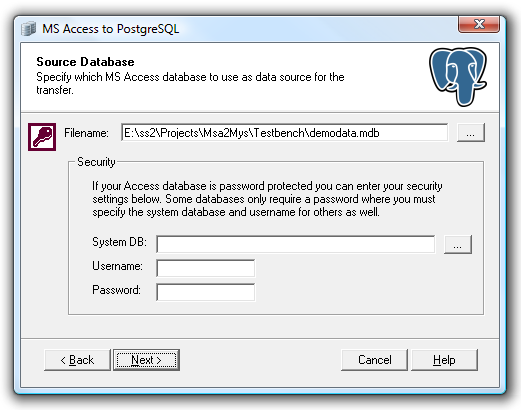
- Click '...' next to 'Filename'
- browse to AccessDB file: 'ethnographic_elements_be.accdb'
- This is not the file used to launch the current MTKEDB, but the file you must associate it with on it's first launch (the backend database something like, MTKEDB\backend\db\ethnographic_elements_be.accdb )
- browse to AccessDB file: 'ethnographic_elements_be.accdb'
- Security:
- System DB: will be disabled
- Username: will be disabled
- Password: leave blank
- Click 'Next >'

- Click 'Create dump file'
- Dump File Options
- Filename: The file you'd like to output to. If it already exists it will be overwritten.
- PostgreSQL Destination Database
- Destination Database: Irrelevant - leave it alone or set it to tekdb
- Click 'Next >'

- Click 'Select All'
- Click 'Next >'

- You may check all
- Recommended:
- Drop and recreate destination database
- Transfer indexes
- Transfer records
- Include column list in INSERT statements
- Create tables (drops existing)
- Unicode (utf-8)
- Field Information
- Default value properties
- Auto number properties
- Click 'Run Now'

- Check output for errors
- If no errors, click 'Exit'
- Put the .sql file somewhere where the TEK Database server can get to it, or upload it to the server using WinSCP
- Ideally this can be uploaded directly through the tool admin, but this hasn't been sorted out yet.
- SSH into the TEK DB server (Windows users should use PuTTY)
- Ask your Sysadmin if you don't know the credentials
- Change directory to the project folder:
cd /usr/local/apps/TEKDB/
- Activate the python virtual environment:
source ./env/bin/activate
- Change directory into the application folder:
cd TEKDB/
- Run the import script:
-
python manage.py import_sql /PATH/TO/DATA.sql- Where
/PATH/TO/DATA.sqlis where you put the .sql file from the Bullzip export on the Linux server.
- Where
-
To sync spatial data with actual “place” and “locality” records, you must first import the base Access Data (see previous section). To use the spatial data it must be imported into the same PostGIS-enabled PostgreSQL database as the base data.
This process is best manages using ArcGIS to export the data to an ESRI Shapefile. This can be managed via Open-Source Tools, but the processes are complex and arduous, and will not be covered in this document.
These steps are written for users with little ArcGIS experience. If you know a faster way to accomplish the main tasks feel free to ignore the 'how'.
- Open ArcGIS
- Set the data frame's coordinate system to WGS 1984 (EPSG:4326)
- Right-Click on the map and select 'Data Frame Properties'
- Click the Coordinate System tab
- Geographic Coordinate Systems → World → WGS 1984
- NOTE: MTKEDB's default appears to be 26910: NAD 1983 UTM zone 10N
- Click 'Apply'
- File → Add Data → Add Data
- In dialog box, find your extracted copy of MTKED
- MTKEDB\backend\gis\ethnographic_places.mdb
- Underneath there are two sets of features:
- Places
- Localities
- Select the feature type you wish to export and click add
- In dialog box, find your extracted copy of MTKED
- On each layer you wish to export:
- Right Click
- Data → Export Data
- Export: All Features
- Use the same coordinate system as: The Data Frame
- Output feature class: Select where you'd like to create the new shapefile
- Click 'OK'
- Data → Export Data
- Right Click
- NOTE: If you followed these directions exactly your resulting shapefile should be in the WGS 1984 projection. There are other ways to set this projection that might be easier for you. If the projection is not set to this, it will have implications in the shp2pgsql steps below.
- Copy the shapefiles over to the TEK DB server
- Using WinSCP will make this fairly easy
- If you can’t install WinSCP, then:
- Move the files to a shared network drive
- Install samba (with smbclient) on the Ubuntu Server
- Use smbclient from the command line to connect and copy the files over
- SSH into the TEK DB server (Windows users should use PuTTY)
- Ask your Sysadmin if you don't know the credentials
- Change directory to the project folder:
cd /usr/local/apps/TEKDB/
- Activate the python virtual environment:
source ./env/bin/activate
- Change directory into the application folder:
cd TEKDB/
- Run the import script:
-
python manage.py import_shp /PATH/TO/SHAPEFILE.shp- Where
/PATH/TO/SHAPEFILE.shpis where you put the .shp file (along with the other required files for a shapefile) from the ArcGIS export on the Linux server. - NOTE: the '.shp' at the end is required. The script will know to pull in the other shapefile files as necessary.
- Where
- Do this for each of the shapefiles you create (up to 6: Places-Polygons/Lines/Points, Localities-Polygons/Lines/Points)
-