This project is built following on top of the comprehensive guide from LangChain official notebook documentation.
It is now becoming a trend that a powerful AI agent gets created by combining several smaller subagents. But this also brings challenges like reducing hallucinations, managing the conversation flow, keeping an eye on how the agent works during testing, allowing human in the loop, and evaluating its performance. You need to do a lot of trial and error.
In this blog, we will start by creating two simple subagents, then build a multi-agent system using a supervisor approach. Along the way, we will cover the basics, the challenges you might face when creating complex AI agentic architecture, and how to evaluate and improve them.
We will use tools like LangGraph and LangSmith to help us with this process.
The repository tree looks like this:
Multi-Agent-AI-System/
├── .env                # Environment variables for API keys
├── README.md           # Project documentation
├── requirements.txt    # Python dependencies
├── multi_agent.ipynb   # Jupyter notebook for the multi-agent AI system
├── utils.py            # Utility functions for the project
└── LICENSE             # Project license information (MIT License)
Make sure you have Python 3.10+ installed on your system, as this project requires it. You can install the required dependencies using pip:
# Clone the Multi-Agent AI System repository from GitHub
git clone https://github.com/FareedKhan-dev/Multi-Agent-AI-System.git

# Navigate into the project directory
cd Multi-Agent-AI-System

# Install all required Python dependencies from requirements.txt
pip install -r requirements.txt- Setting up the Environment
- Purpose of LangSmith
- Choosing our Dataset
- Short-Term and Long-Term Memory
- Our Multi-Agent Architecture
- Catalog Information Sub-agent
- Invoice Information Sub-agent Using Pre-built
- Creating Multi-Agent Using Supervisor
- Adding Human-in-the-Loop
- Adding Long-Term Memory
- Evaluating our Multi-AI Agent
- Swarm vs Supervisor
So, LangChain, LangGraph all these modules form an entire architecture. If I import all the libraries at once, it will definitely create confusion.
So we will only import modules when they are needed, as it will help us learn in a proper way.
The very first step is to create environment variables that will hold our sensitive info like API keys and other such things.
import os

# Set environment variables for API integrations
os.environ["OPENAI_API_KEY"] = "your-openai-api-key"
os.environ["LANGSMITH_API_KEY"] = "your-langsmith-api-key"
os.environ["LANGSMITH_TRACING"] = "true"  # Enables LangSmith tracing
os.environ["LANGSMITH_PROJECT"] = "intelligent-rag-system"  # Project name for organizing LangSmith traces
We will be using OpenAI models for both text generation and embeddings in this project. While the original notebook may reference other providers like Nebius AI or Together AI, LangChain offers extensive support for various model providers. You can explore the full range of available embedding and text generation models in their documentation.
LangSmith might be a new term for you. In case you don't know what it is, in the next section we will discuss its purpose. If you already know, you can skip to the following section.
To get the LangSmith API key, you can go to their website and create an account. After that, under settings, you will find your API key.
from langsmith import utils

# Check and print whether LangSmith tracing is currently enabled
print(f"LangSmith tracing is enabled: {utils.tracing_is_enabled()}")
### output ###
LangSmith tracing is enabled: True
We just imported the utils from LangSmith that we will be using later, and tracing is set to true because previously we set the environment variable LANGSMITH_TRACING = TRUE, which helps us record and visualize the execution of our AI Agent application.
When we build AI agentic apps with LLMs, LangSmith helps you understand and improve them. It works like a dashboard that shows what is happening inside your app and lets you:
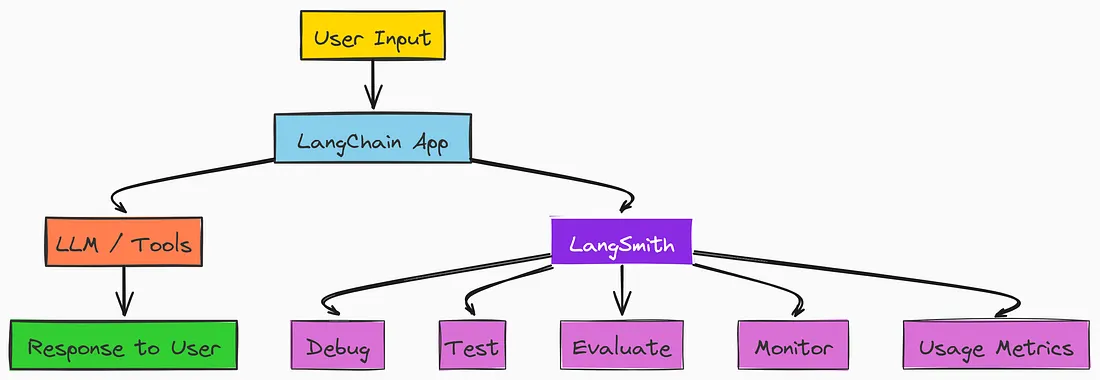
- Debug when things go wrong
- Test your prompts and logic
- Evaluate how good the answers are
- Monitor your app in real time
- Track usage, speed, and cost
LangSmith makes all of this easy to use, even if you are not a developer.
So, now that we understand the high-level purpose of LangSmith, and since we will be coding within it from time to time, let's import it.
We are going to use the Chinook Database, which is a popular sample database used for learning and testing SQL. It simulates a digital music store’s data and operations, such as customer information, purchase history, and music catalog.
It comes in multiple formats like MySQL, PostgreSQL, and others, but we are going to use the SQLite version of the data, as it also helps us learn how an AI agent interacts with a database, especially useful for someone who is new to this AI agent guide.
So, let's define a function that will set up the SQLite database for us.
import sqlite3
import requests
from langchain_community.utilities.sql_database import SQLDatabase
from sqlalchemy import create_engine
from sqlalchemy.pool import StaticPool

def get_engine_for_chinook_db():
    """
    Pull SQL file, populate in-memory database, and create engine.

    Downloads the Chinook database SQL script from GitHub and creates an in-memory
    SQLite database populated with the sample data.

    Returns:
        sqlalchemy.engine.Engine: SQLAlchemy engine connected to the in-memory database
    """
    # Download the Chinook database SQL script from the official repository
    url = "https://raw.githubusercontent.com/lerocha/chinook-database/master/ChinookDatabase/DataSources/Chinook_Sqlite.sql"
    response = requests.get(url)
    sql_script = response.text

    # Create an in-memory SQLite database connection
    # check_same_thread=False allows the connection to be used across threads
    connection = sqlite3.connect(":memory:", check_same_thread=False)

    # Execute the SQL script to populate the database with sample data
    connection.executescript(sql_script)

    # Create and return a SQLAlchemy engine that uses the populated connection
    return create_engine(
        "sqlite://",  # SQLite URL scheme
        creator=lambda: connection,  # Function that returns the database connection
        poolclass=StaticPool,  # Use StaticPool to maintain single connection
        connect_args={"check_same_thread": False},  # Allow cross-thread usage
    )
So we just defined our first function, get_engine_for_chinook_db(), which sets up a temporary in-memory SQLite database using the Chinook sample dataset.
It downloads the SQL script from GitHub, creates the database in memory, runs the script to populate it with tables and data, and then returns a SQLAlchemy engine connected to this database.
Now we need to initialize this function so that the SQLite database gets created.
# Initialize the database engine with the Chinook sample data
engine = get_engine_for_chinook_db()

# Create a LangChain SQLDatabase wrapper around the engine
# This provides convenient methods for database operations and query execution
db = SQLDatabase(engine)
We just called the function and initialized the engine to run query operations on that database later on using the AI agent.
Now, that we initialize our database, we are going to look for first advantage of our combo (LangGraph + LangSmith), which is the two different types of memory availability, but first understand what is memory.
In any intelligent agent, memory plays a important role. Just like humans, an AI agent needs to remember past interactions to maintain context and provide personalized responses.
In LangGraph, we differentiate between short-term memory and long-term memory, here is quick difference between them:
- Short-term memory helps an agent keep track of the current conversation. In LangGraph, this is handled by a MemorySaver, which saves and resumes the state of the conversation.
- While Long-term memory lets the agent remember information across different conversations, like user preferences. For example, we can use an InMemoryStore for quick storage, but in real apps, you’d use a more permanent database.
Let’s initialize them both.
from langgraph.checkpoint.memory import MemorySaver
from langgraph.store.memory import InMemoryStore

# Initialize long-term memory store for persistent data between conversations
in_memory_store = InMemoryStore()

# Initialize checkpointer for short-term memory within a single thread/conversation
checkpointer = MemorySaver()
We are using in_memory_store as long-term memory which will let us save user preferences even after a conversation ends.
Meanwhile, the MemorySaver (checkpointer) keeps the current conversation’s context intact, enabling smooth multi-turn interactions.
So, our goal is to a realistic customer support agent which is not a single agent but through a multi-agent workflow in LangGraph.
We will start from a simple ReAct agent and add additional steps into the workflow, simulating a realistic customer support example, showcasing human-in-the-loop, long term memory, and the LangGraph pre-built library.
We will be building each of these components of our multi-agent workflow step by step, as it contains two sub-agents, two specialized ReAct (Reasoning and Acting) sub-agents which will then combine to create a multi-agent workflow including additional steps.
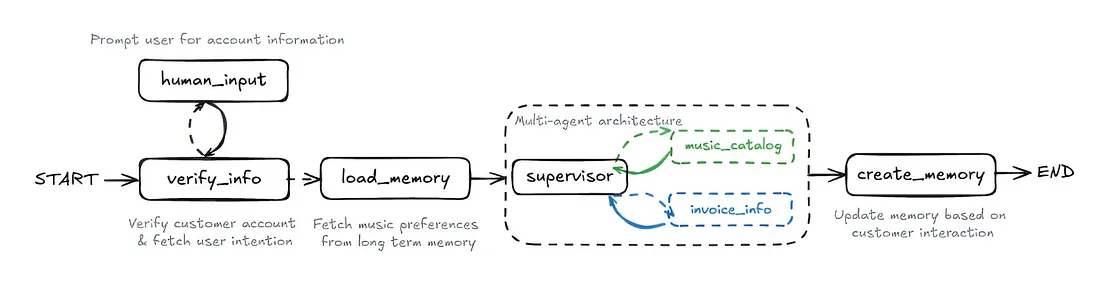
Our workflow starts with:
- human_input, where the user provides account information.
- Then, in verify_info, the system checks the account and clarifies the user’s intent if needed.
- Next, load_memory retrieves the user’s music preferences.
- The supervisor coordinates two sub-agents: music_catalog (for music data) and invoice_info (for billing).
- Finally, create_memory updates the user’s memory with new info from the interaction.
So now we have understand the basic, Let’s start building our first sub agent.
Our first sub-agent will be a music catalog information agent. Its primary role will be to assist customers with inquiries related to our digital music catalog, such as searching for artists, albums, or songs.
How will our agent remember information, decide what to do, and carry out actions? This brings us to three fundamental LangGraph concepts: State, Tools, and Nodes.
In LangGraph, the State holds the current data snapshot flowing through the graph, basically the agent’s memory.
For our customer support agent, the State includes:
- customer_id: Identifies the customer for personalized responses and data retrieval.
- messages: A list of all messages exchanged in the conversation, giving context to the agent.
- loaded_memory: Long-term user-specific info (like preferences) loaded into the conversation.
- remaining_steps: Counts how many steps are left to prevent infinite loops.
Each node updates this State as the conversation progresses. Let’s define our State using TypedDict for type hinting and Annotated from LangGraph's message module for easy message appending.
from typing_extensions import TypedDict
from typing import Annotated, List
from langgraph.graph.message import AnyMessage, add_messages
from langgraph.managed.is_last_step import RemainingSteps

class State(TypedDict):
    """
    State schema for the multi-agent customer support workflow.

    This defines the shared data structure that flows between nodes in the graph,
    representing the current snapshot of the conversation and agent state.
    """
    # Customer identifier retrieved from account verification
    customer_id: str

    # Conversation history with automatic message aggregation
    messages: Annotated[list[AnyMessage], add_messages]

    # User preferences and context loaded from long-term memory store
    loaded_memory: str

    # Counter to prevent infinite recursion in agent workflow
    remaining_steps: RemainingSteps
This State class will serve as the blueprint for how information is managed and passed between different parts of our multi-agent system.
Next, we’ll extend our agent’s abilities using Tools. Tools are functions that let the LLM do things it can’t do on its own, like calling APIs or accessing databases.
For our agent, tools will connect to the Chinook database to fetch music-related info.
We’ll define Python functions and mark them with @tool from langchain_core.tools, so the LLM can find and use them when needed.
from langchain_core.tools import tool
import ast

@tool
def get_albums_by_artist(artist: str):
    """
    Get albums by an artist from the music database.

    Args:
        artist (str): The name of the artist to search for albums.

    Returns:
        str: Database query results containing album titles and artist names.
    """
    return db.run(
        f"""
        SELECT Album.Title, Artist.Name
        FROM Album
        JOIN Artist ON Album.ArtistId = Artist.ArtistId
        WHERE Artist.Name LIKE '%{artist}%';
        """,
        include_columns=True
    )

@tool
def get_tracks_by_artist(artist: str):
    """
    Get songs/tracks by an artist (or similar artists) from the music database.

    Args:
        artist (str): The name of the artist to search for tracks.

    Returns:
        str: Database query results containing song names and artist names.
    """
    return db.run(
        f"""
        SELECT Track.Name as SongName, Artist.Name as ArtistName
        FROM Album
        LEFT JOIN Artist ON Album.ArtistId = Artist.ArtistId
        LEFT JOIN Track ON Track.AlbumId = Album.AlbumId
        WHERE Artist.Name LIKE '%{artist}%';
        """,
        include_columns=True
    )

@tool
def get_songs_by_genre(genre: str):
    """
    Fetch songs from the database that match a specific genre.

    This function first looks up the genre ID(s) for the given genre name,
    then retrieves songs that belong to those genre(s), limiting results
    to 8 songs grouped by artist.

    Args:
        genre (str): The genre of the songs to fetch.

    Returns:
        list[dict] or str: A list of songs with artist information that match
                          the specified genre, or an error message if no songs found.
    """
    # First, get the genre ID(s) for the specified genre
    genre_id_query = f"SELECT GenreId FROM Genre WHERE Name LIKE '%{genre}%'"
    genre_ids = db.run(genre_id_query)

    # Check if any genres were found
    if not genre_ids:
        return f"No songs found for the genre: {genre}"

    # Parse the genre IDs and format them for the SQL query
    genre_ids = ast.literal_eval(genre_ids)
    genre_id_list = ", ".join(str(gid[0]) for gid in genre_ids)

    # Query for songs in the specified genre(s)
    songs_query = f"""
        SELECT Track.Name as SongName, Artist.Name as ArtistName
        FROM Track
        LEFT JOIN Album ON Track.AlbumId = Album.AlbumId
        LEFT JOIN Artist ON Album.ArtistId = Artist.ArtistId
        WHERE Track.GenreId IN ({genre_id_list})
        GROUP BY Artist.Name
        LIMIT 8;
    """
    songs = db.run(songs_query, include_columns=True)

    # Check if any songs were found
    if not songs:
        return f"No songs found for the genre: {genre}"

    # Format the results into a structured list of dictionaries
    formatted_songs = ast.literal_eval(songs)
    return [
        {"Song": song["SongName"], "Artist": song["ArtistName"]}
        for song in formatted_songs
    ]

@tool
def check_for_songs(song_title):
    """
    Check if a song exists in the database by its name.

    Args:
        song_title (str): The title of the song to search for.

    Returns:
        str: Database query results containing all track information
             for songs matching the given title.
    """
    return db.run(
        f"""
        SELECT * FROM Track WHERE Name LIKE '%{song_title}%';
        """,
        include_columns=True
    )
In this block, we have defined four specific tools:
get_albums_by_artist: To find albums by a given artistget_tracks_by_artist: To find individual songs by an artistget_songs_by_genre: To retrieve songs belonging to a specific genrecheck_for_songs: To verify if a particular song exists in the catalog
Each of these tools interacts with our db (the SQLDatabase wrapper we initialized earlier) by executing a SQL query. The results are then returned in a structured format.
# Create a list of all music-related tools for the agent
music_tools = [get_albums_by_artist, get_tracks_by_artist, get_songs_by_genre, check_for_songs]

# Bind the music tools to the language model for use in the ReAct agent
llm_with_music_tools = llm.bind_tools(music_tools)
Finally, we bind these music_tools to our llm using llm.bind_tools().
This crucial step allows the LLM to understand when and how to call these functions based on the user's query.
Now that our State are being defined and Tools ready, we can now define the Nodes of our graph.
Nodes are the core processing units in a LangGraph application that take the graph current State as input, perform some logic, and return an updated State.
For our ReAct agent, we will define two key types of nodes:
- music_assistant is the LLM reasoning node. It uses the current conversation history and memory to decide the next action, either calling a tool or generating a response, and updates the State.
- music_tool_node runs the tool selected by music_assistant. LangGraph ToolNode manages the tool call and updates the State with the result.
By combining these nodes, we enable dynamic reasoning and action within our multi-agent workflow.
Let’s first create the ToolNode for our music_tools:
from langgraph.prebuilt import ToolNode

# Create a tool node that executes the music-related tools
# ToolNode is a pre-built LangGraph component that handles tool execution
music_tool_node = ToolNode(music_tools)
Now, we’ll define the music_assistant node. This node will use our LLM (with the music_tools bound to it) to determine the next action.
It also incorporates any loaded_memory into its prompt, allowing for personalized responses.
from langchain_core.messages import ToolMessage, SystemMessage, HumanMessage
from langchain_core.runnables import RunnableConfig

def generate_music_assistant_prompt(memory: str = "None") -> str:
    """
    Generate a system prompt for the music assistant agent.

    Args:
        memory (str): User preferences and context from long-term memory store

    Returns:
        str: Formatted system prompt for the music assistant
    """
    return f"""
    You are a member of the assistant team, your role specifically is to focused on helping customers discover and learn about music in our digital catalog.
    If you are unable to find playlists, songs, or albums associated with an artist, it is okay.
    Just inform the customer that the catalog does not have any playlists, songs, or albums associated with that artist.
    You also have context on any saved user preferences, helping you to tailor your response.

    CORE RESPONSIBILITIES:
    - Search and provide accurate information about songs, albums, artists, and playlists
    - Offer relevant recommendations based on customer interests
    - Handle music-related queries with attention to detail
    - Help customers discover new music they might enjoy
    - You are routed only when there are questions related to music catalog; ignore other questions.

    SEARCH GUIDELINES:
    1. Always perform thorough searches before concluding something is unavailable
    2. If exact matches aren't found, try:
       - Checking for alternative spellings
       - Looking for similar artist names
       - Searching by partial matches
       - Checking different versions/remixes
    3. When providing song lists:
       - Include the artist name with each song
       - Mention the album when relevant
       - Note if it's part of any playlists
       - Indicate if there are multiple versions

    Additional context is provided below:

    Prior saved user preferences: {memory}

    Message history is also attached.
    """
We also need to create a music_assistant function too, so let's create one.
def music_assistant(state: State, config: RunnableConfig):
    """
    Music assistant node that handles music catalog queries and recommendations.

    This node processes customer requests related to music discovery, album searches,
    artist information, and personalized recommendations based on stored preferences.

    Args:
        state (State): Current state containing customer_id, messages, loaded_memory, etc.
        config (RunnableConfig): Configuration for the runnable execution

    Returns:
        dict: Updated state with the assistant's response message
    """
    # Retrieve long-term memory preferences if available
    memory = "None"
    if "loaded_memory" in state:
        memory = state["loaded_memory"]

    # Generate instructions for the music assistant agent
    music_assistant_prompt = generate_music_assistant_prompt(memory)

    # Invoke the language model with tools and system prompt
    # The model can decide whether to use tools or respond directly
    response = llm_with_music_tools.invoke([SystemMessage(music_assistant_prompt)] + state["messages"])

    # Return updated state with the assistant's response
    return {"messages": [response]}
The music_assistant node constructs a detailed system prompt for the LLM, including general instructions and the loaded_memory for personalization.
It then invokes the llm_with_music_tools with this system message and the current conversation messages. Based on its reasoning, the LLM might output a final answer or a tool call.
It simply returns this LLM response, which add_messages (from our State definition) will automatically append to the messages list in the State.
With our State and Nodes in place, the next step is to connect them using Edges, which define the execution flow in the graph.
Normal Edges are straightforward — they always route from one specific node to another.
Conditional Edges are dynamic. These are Python functions that examine the current State and decide which node to visit next.
For our ReAct agent, we need a conditional edge that checks whether the music_assistant should:
- Invoke tools: If the LLM decides to call a tool, we route to
music_tool_nodeto execute it. - End the process, If the LLM provides a final response without tool calls, we conclude the sub-agent’s execution.
To handle this logic, we define the should_continue function.
def should_continue(state: State, config: RunnableConfig):
    """
    Conditional edge function that determines the next step in the ReAct agent workflow.

    This function examines the last message in the conversation to decide whether the agent
    should continue with tool execution or end the conversation.

    Args:
        state (State): Current state containing messages and other workflow data
        config (RunnableConfig): Configuration for the runnable execution

    Returns:
        str: Either "continue" to execute tools or "end" to finish the workflow
    """
    # Get all messages from the current state
    messages = state["messages"]

    # Examine the most recent message to check for tool calls
    last_message = messages[-1]

    # If the last message doesn't contain any tool calls, the agent is done
    if not last_message.tool_calls:
        return "end"
    # If there are tool calls present, continue to execute them
    else:
        return "continue"
The should_continue function checks the last message in the State. If it includes tool_calls, it means the LLM wants to use a tool, so the function returns "continue".
Otherwise, it returns "end", indicating the LLM has provided a direct response and the sub-agent’s task is complete.
Now that we have all the pieces, State, Nodes, and Edges.
Let’s assemble them to construct our complete ReAct agent using StateGraph.
from langgraph.graph import StateGraph, START, END
from utils import show_graph # Assuming utils.py has this function
# Create a new StateGraph instance for the music workflow
music_workflow = StateGraph(State)
# Add nodes to the graph
# music_assistant: The reasoning node that decides which tools to invoke or responds directly
music_workflow.add_node("music_assistant", music_assistant)
# music_tool_node: The execution node that handles all music-related tool calls
music_workflow.add_node("music_tool_node", music_tool_node)
# Add edges to define the flow of the graph
# Set the entry point - all queries start with the music assistant
music_workflow.add_edge(START, "music_assistant")
# Add conditional edge from music_assistant based on whether tools need to be called
music_workflow.add_conditional_edges(
"music_assistant",
# Conditional function that determines the next step
should_continue,
{
# If tools need to be executed, route to tool node
"continue": "music_tool_node",
# If no tools needed, end the workflow
"end": END,
},
)
# After tool execution, always return to the music assistant for further processing
music_workflow.add_edge("music_tool_node", "music_assistant")
# Compile the graph with checkpointer for short-term memory and store for long-term memory
music_catalog_subagent = music_workflow.compile(
name="music_catalog_subagent",
checkpointer=checkpointer,
store=in_memory_store
)
# Display the compiled graph structure
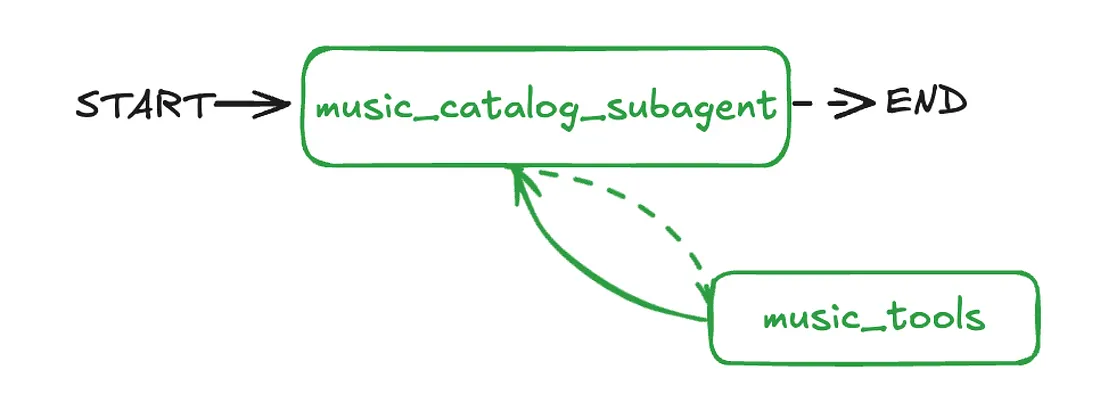
show_graph(music_catalog_subagent)In this final step, we create a StateGraph using our defined State. We add nodes for both music_assistant and music_tool_node.
The graph starts at START, which leads to music_assistant. The core ReAct loop is set up with conditional edges from music_assistant that route to music_tool_node if a tool call is detected, or to END if the response is final.
After music_tool_node runs, an edge brings the flow back to music_assistant, allowing the LLM to process the tool’s output and continue reasoning.
Let’s take a look at our graph:

Now, its time to test our first sub agent:
import uuid
from langchain_core.messages import HumanMessage # Assuming HumanMessage is imported or defined elsewhere

# Generate a unique thread ID for this conversation session
thread_id = uuid.uuid4()

# Define the user's question about music recommendations
question = "I like the Rolling Stones. What songs do you recommend by them or by other artists that I might like?"

# Set up configuration with the thread ID for maintaining conversation context
config = {"configurable": {"thread_id": thread_id}}

# Invoke the music catalog subagent with the user's question
# The agent will use its tools to search for Rolling Stones music and provide recommendations
result = music_catalog_subagent.invoke({"messages": [HumanMessage(content=question)]}, config=config)

# Display all messages from the conversation in a formatted way
for message in result["messages"]:
   message.pretty_print() # Assuming message.pretty_print() is a custom method
======= Human Message ======
I like the Rolling Stones. What songs do you recommend by them or by
other artists that I might like?
======= Ai Message ======
Tool Calls:
get_tracks_by_artist (chatcmpl-tool-012bac57d6af46ddaad8e8971cca2bf7)
Call ID: chatcmpl-tool-012bac57d6af46ddaad8e8971cca2bf7
Args:
artist: The Rolling Stones
So, based on the human message which is our query, it responds with the correct tool get_tracks_by_artist which is responsible for finding recommendations based on the artist specified in our query.
Now, that we have created our first sub agent let’s create our second sub agent.
While building a ReAct agent from scratch is great for understanding the fundamentals, LangGraph also offers pre-built libraries for common architectures.
As it allow us to quickly set up standard patterns like ReAct without manually defining all nodes and edges. You can find a full list of these pre-built libraries in the LangGraph documentation.
Just like before, we start by defining the specific tools and the prompt for our invoice_information_subagent. These tools will interact with the Chinook database to retrieve invoice details.
from langchain_core.tools import tool

@tool
def get_invoices_by_customer_sorted_by_date(customer_id: str) -> list[dict]:
    """
    Look up all invoices for a customer using their ID.
    The invoices are sorted in descending order by invoice date, which helps when the customer wants to view their most recent/oldest invoice, or if
    they want to view invoices within a specific date range.

    Args:
        customer_id (str): customer_id, which serves as the identifier.

    Returns:
        list[dict]: A list of invoices for the customer.
    """
    return db.run(f"SELECT * FROM Invoice WHERE CustomerId = {customer_id} ORDER BY InvoiceDate DESC;")

@tool
def get_invoices_sorted_by_unit_price(customer_id: str) -> list[dict]:
    """
    Use this tool when the customer wants to know the details of one of their invoices based on the unit price/cost of the invoice.
    This tool looks up all invoices for a customer, and sorts the unit price from highest to lowest. In order to find the invoice associated with the customer,
    we need to know the customer ID.

    Args:
        customer_id (str): customer_id, which serves as the identifier.

    Returns:
        list[dict]: A list of invoices sorted by unit price.
    """
    query = f"""
        SELECT Invoice.*, InvoiceLine.UnitPrice
        FROM Invoice
        JOIN InvoiceLine ON Invoice.InvoiceId = InvoiceLine.InvoiceId
        WHERE Invoice.CustomerId = {customer_id}
        ORDER BY InvoiceLine.UnitPrice DESC;
    """
    return db.run(query)

@tool
def get_employee_by_invoice_and_customer(invoice_id: str, customer_id: str) -> dict:
    """
    This tool will take in an invoice ID and a customer ID and return the employee information associated with the invoice.

    Args:
        invoice_id (int): The ID of the specific invoice.
        customer_id (str): customer_id, which serves as the identifier.

    Returns:
        dict: Information about the employee associated with the invoice.
    """

    query = f"""
        SELECT Employee.FirstName, Employee.Title, Employee.Email
        FROM Employee
        JOIN Customer ON Customer.SupportRepId = Employee.EmployeeId
        JOIN Invoice ON Invoice.CustomerId = Customer.CustomerId
        WHERE Invoice.InvoiceId = ({invoice_id}) AND Invoice.CustomerId = ({customer_id});
    """

    employee_info = db.run(query, include_columns=True)

    if not employee_info:
        return f"No employee found for invoice ID {invoice_id} and customer identifier {customer_id}."
    return employee_info
We have defined three specialized tools for invoice handling:
get_invoices_by_customer_sorted_by_date: Retrieves all invoices for a customer, sorted by dateget_invoices_sorted_by_unit_price: Retrieves invoices sorted by the unit price of items within themget_employee_by_invoice_and_customer: Finds the support employee associated with a specific invoice
And also after just like before we have to append all these tools into a list.
# Create a list of all invoice-related tools for the agent
invoice_tools = [get_invoices_by_customer_sorted_by_date, get_invoices_sorted_by_unit_price, get_employee_by_invoice_and_customer]
Now, let’s define the prompt that will guide our invoice sub-agent’s behavior:
invoice_subagent_prompt = """
    You are a subagent among a team of assistants. You are specialized for retrieving and processing invoice information. You are routed for invoice-related portion of the questions, so only respond to them..

    You have access to three tools. These tools enable you to retrieve and process invoice information from the database. Here are the tools:
    - get_invoices_by_customer_sorted_by_date: This tool retrieves all invoices for a customer, sorted by invoice date.
    - get_invoices_sorted_by_unit_price: This tool retrieves all invoices for a customer, sorted by unit price.
    - get_employee_by_invoice_and_customer: This tool retrieves the employee information associated with an invoice and a customer.

    If you are unable to retrieve the invoice information, inform the customer you are unable to retrieve the information, and ask if they would like to search for something else.

    CORE RESPONSIBILITIES:
    - Retrieve and process invoice information from the database
    - Provide detailed information about invoices, including customer details, invoice dates, total amounts, employees associated with the invoice, etc. when the customer asks for it.
    - Always maintain a professional, friendly, and patient demeanor

    You may have additional context that you should use to help answer the customer's query. It will be provided to you below:
    """
This prompt outlines the sub-agent’s role, its available tools, core responsibilities, and guidelines for handling cases where information isn’t found.
This targeted instruction helps the LLM act effectively within its specialized domain.
Now, Instead of manually creating nodes and conditional edges for the ReAct pattern as we did with our previous sub agent, we will use LangGraph create_react_agent pre-built function.
from langgraph.prebuilt import create_react_agent

# Create the invoice information subagent using LangGraph's pre-built ReAct agent
# This agent specializes in handling customer invoice queries and billing information
invoice_information_subagent = create_react_agent(
    llm,                           # Language model for reasoning and responses
    tools=invoice_tools,           # Invoice-specific tools for database queries
    name="invoice_information_subagent",  # Unique identifier for the agent
    prompt=invoice_subagent_prompt,       # System instructions for invoice handling
    state_schema=State,            # State schema for data flow between nodes
    checkpointer=checkpointer,     # Short-term memory for conversation context
    store=in_memory_store         # Long-term memory store for persistent data
)
The create_react_agent function takes our llm, the invoice_tools, a name for the agent (important for multi-agent routing), the prompt we just defined, our custom State schema, and hooks up the checkpointer and store for memory.
With just few lines, we have a fully functional ReAct agent, this is the advantage we have using LangGraph.
Let’s test our new invoice_information_subagent to ensure it works as expected. We'll provide a query that requires fetching invoice and employee information.
# Generate a unique thread ID for this conversation session
thread_id = uuid.uuid4()

# Define the user's question about their recent invoice and employee assistance
question = "My customer id is 1. What was my most recent invoice, and who was the employee that helped me with it?"

# Set up configuration with the thread ID for maintaining conversation context
config = {"configurable": {"thread_id": thread_id}}

# Invoke the invoice information subagent with the user's question
# The agent will use its tools to search for invoice information and employee details
result = invoice_information_subagent.invoke({"messages": [HumanMessage(content=question)]}, config=config)

# Display all messages from the conversation in a formatted way
for message in result["messages"]:
    message.pretty_print()
======= Human Message ======
My customer id is 1. What was my most recent invoice, and who
was the employee that helped me with it?
======= Ai Message ======
Name: invoice_information_subagent
Tool Calls:
get_invoices_by_customer_sorted_by_date (chatcmpl-tool-8f3cc6f6ef41454099eaae576409bfe2)
Call ID: chatcmpl-tool-8f3cc6f6ef41454099eaae576409bfe2
Args:
customer_id: 1
It prints the correct tool based on our query, and the output is pretty much the same as we saw earlier with our first sub-agent that we manually created, with all the correct arguments fetched from the query.
So, we have created two sub-agents, now we can move on to creating the Multi-Agent architecture. Let’s do that.
We have two sub-agents: one for music questions and one for invoices. A natural question arises:
How do we ensure customer tasks are appropriately routed to the correct sub-agent?
This is where the concept of a Supervisor Agent comes into play. It routes customer requests to the right sub-agent based on the query. After a sub-agent finishes, control goes back to the supervisor or can be passed to another sub-agent.
A supervisor-based multi-agent architecture brings key benefits:
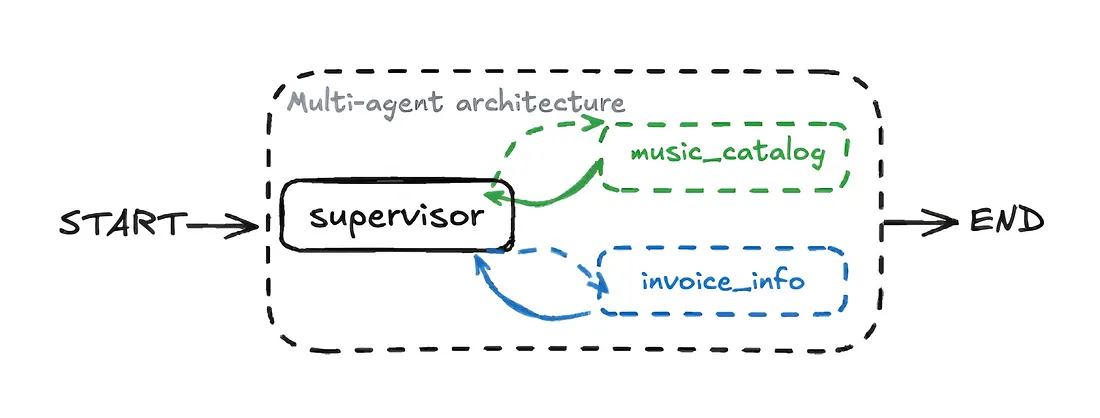
- Each sub-agent focuses on a specific domain, improving accuracy and making it easy to add new agents.
- Agents can be added, removed, or updated without impacting the whole system, supporting scalability.
- Limiting LLMs to specific tasks lowers the chance of wrong or irrelevant outputs.
We will use LangGraph built-in supervisor library to quickly build this multi-agent setup.
First, we will create a set of instructions for our supervisor. This prompt will define its role, inform it about the available sub-agents and their capabilities, and guide its decision-making process for routing.
supervisor_prompt = """You are an expert customer support assistant for a digital music store.
You are dedicated to providing exceptional service and ensuring customer queries are answered thoroughly.
You have a team of subagents that you can use to help answer queries from customers.
Your primary role is to serve as a supervisor/planner for this multi-agent team that helps answer queries from customers.

Your team is composed of two subagents that you can use to help answer the customer's request:
1. music_catalog_information_subagent: this subagent has access to user's saved music preferences. It can also retrieve information about the digital music store's music
catalog (albums, tracks, songs, etc.) from the database.
3. invoice_information_subagent: this subagent is able to retrieve information about a customer's past purchases or invoices
from the database.

Based on the existing steps that have been taken in the messages, your role is to generate the next subagent that needs to be called.
This could be one step in an inquiry that needs multiple sub-agent calls. """
This supervisor prompt defines its role as a router and planner, understanding what the music_catalog_information_subagent and invoice_information_subagent can do, and deciding which one to call next.
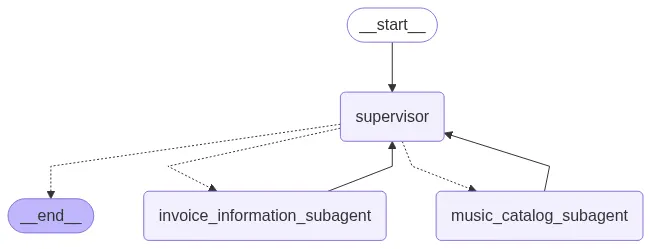
Now, let’s put our supervisor to work using the create_supervisor function from LangGraph pre-built.
from langgraph_supervisor import create_supervisor # Assuming this is a custom or pre-built library

# Create supervisor workflow using LangGraph's pre-built supervisor
# The supervisor coordinates between multiple subagents based on the incoming queries
supervisor_prebuilt_workflow = create_supervisor(
    agents=[invoice_information_subagent, music_catalog_subagent],  # List of subagents to supervise
    output_mode="last_message",  # Return only the final response (alternative: "full_history")
    model=llm,  # Language model for supervisor reasoning and routing decisions
    prompt=(supervisor_prompt),  # System instructions for the supervisor agent
    state_schema=State  # State schema defining data flow structure
)

# Compile the supervisor workflow with memory components
# - checkpointer: Enables short-term memory within conversation threads
# - store: Provides long-term memory storage across conversations
supervisor_prebuilt = supervisor_prebuilt_workflow.compile(
    name="music_catalog_subagent",
    checkpointer=checkpointer,
    store=in_memory_store
)

# Display the compiled supervisor graph structure
show_graph(supervisor_prebuilt)
We provide it with our list of sub-agents, set the output_mode to return only the last message from the active sub-agent, specify our LLM model, supply the supervisor prompt, and connect our State schema.
Let’s see what our supervisor architecture looks like:
As I said earlier supervisor is comprised of our two sub agent that we defined earlier as they will act according to supervisor prompt we described.
Let’s test our supervisor based multi-agent architecture and see how it goes.
# Generate a unique thread ID for this conversation session
thread_id = uuid.uuid4()

# Define a question that tests both invoice and music catalog capabilities
question = "My customer ID is 1. How much was my most recent purchase? What albums do you have by U2?"

# Set up configuration with the thread ID for maintaining conversation context
config = {"configurable": {"thread_id": thread_id}}

# Invoke the supervisor workflow with the multi-part question
# The supervisor will route to appropriate subagents for invoice and music queries
result = supervisor_prebuilt.invoke({"messages": [HumanMessage(content=question)]}, config=config)

# Display all messages from the conversation in a formatted way
for message in result["messages"]:
    message.pretty_print()
================================ [1m Human Message [0m=================================
My customer ID is 1. How much was my most recent purchase? What albums do you have by U2?
================================== [1m Ai Message [0m==================================
Name: supervisor
Tool Calls:
transfer_to_invoice_information_subagent (chatcmpl-tool-bece02300e1845dea927ce0e505e1f7f)
Call ID: chatcmpl-tool-bece02300e1845dea927ce0e505e1f7f
Args:
================================= [1m Tool Message [0m=================================
Name: transfer_to_invoice_information_subagent
Successfully transferred to invoice_information_subagent
================================== [1m Ai Message [0m==================================
Name: invoice_information_subagent
Your most recent purchase was on '2025-08-07 00:00:00' and the total amount was $8.91. Unfortunately, I am unable to provide information about U2 albums as it is not related to invoice information. Would you like to search for something else?
================================== [1m Ai Message [0m==================================
Name: invoice_information_subagent
Transferring back to supervisor
Tool Calls:
transfer_back_to_supervisor (9f3d9fce-0f11-43c0-88c4-adcd459a30a0)
Call ID: chatcmpl-tool-9f3d9fce-0f11-43c0-88c4-adcd459a30a0
Args:
================================= [1m Tool Message [0m=================================
Name: transfer_back_to_supervisor
Successfully transferred back to supervisor
================================== [1m Ai Message [0m==================================
Name: supervisor
Tool Calls:
transfer_to_music_catalog_information_subagent (chatcmpl-tool-72475cf0c17f404583145912fca0b718)
Call ID: chatcmpl-tool-72475cf0c17f404583145912fca0b718
Args:
================================= [1m Tool Message [0m=================================
Name: transfer_to_music_catalog_information_subagent
Error: transfer_to_music_catalog_information_subagent is not a valid tool, try one of [transfer_to_music_catalog_subagent, transfer_to_invoice_information_subagent].
================================== [1m Ai Message [0m==================================
Name: supervisor
Tool Calls:
transfer_to_music_catalog_subagent (chatcmpl-tool-71cc764428ff4efeb0ba7bf24b64a6ec)
Call ID: chatcmpl-tool-71cc764428ff4efeb0ba7bf24b64a6ec
Args:
================================= [1m Tool Message [0m=================================
Name: transfer_to_music_catalog_subagent
Successfully transferred to music_catalog_subagent
================================== [1m Ai Message [0m==================================
U2 has the following albums in our catalog:
1. Achtung Baby
2. All That You Can't Leave Behind
3. B-Sides 1980-1990
4. How To Dismantle An Atomic Bomb
5. Pop
6. Rattle And Hum
7. The Best Of 1980-1990
8. War
9. Zooropa
10. Instant Karma: The Amnesty International Campaign to Save Darfur
Would you like to explore more music or is there something else I can help you with?
================================== [1m Ai Message [0m==================================
Name: music_catalog_subagent
Transferring back to supervisor
Tool Calls:
transfer_back_to_supervisor (4739ce04-dd11-47c8-b35a-9e4fca21b0c1)
Call ID: chatcmpl-tool-4739ce04-dd11-47c8-b35a-9e4fca21b0c1
Args:
================================= [1m Tool Message [0m=================================
Name: transfer_back_to_supervisor
Successfully transferred back to supervisor
================================== [1m Ai Message [0m==================================
Name: supervisor
I hope this information helps you with your inquiry. Is there anything else I can help you with?
There is a lot happening around, which is great our multi agent is having a very detailed conversation with our user. Let’s understand this.
In this example, the user asks a question involving both invoice details and music catalog data. Here’s what happens:
- The supervisor receives the query.
- It detects the invoice-related part (“most recent purchase”) and sends it to the
invoice_information_subagent. - The invoice sub-agent processes that part, fetches the invoice, but can’t answer the U2 albums question, so it hands control back to the supervisor.
- The supervisor then routes the remaining music query to the
music_catalog_subagent. - The music sub-agent retrieves the U2 albums info and returns control to the supervisor.
- The supervisor wraps up, having coordinated both sub-agents to fully answer the user’s multi-part question.
So far we have built a multi-agent system that routes customer queries to specialized sub-agents. However, in a real-world customer support scenario, we don’t always have the customer_id readily available.
Before allowing an agent to access sensitive information like invoice history, we typically need to verify the customer’s identity.
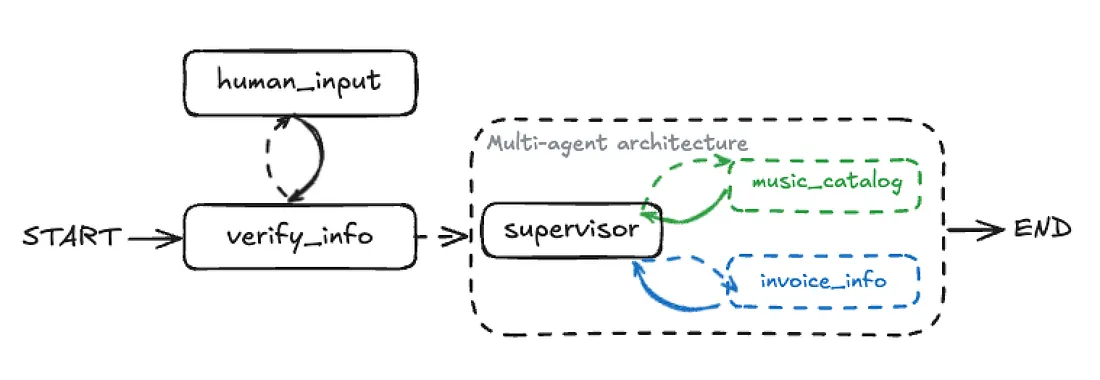
In this step, we will enhance our workflow by adding a customer verification layer. This will involve a human-in-the-loop component, where the system might pause and prompt the customer to provide their account information if it’s missing or unverified.
To implement this, we introduce two new nodes:
- verify_info node attempts to extract and verify customer identification (ID, email, or phone) from the user input using our database.
- human_input node is triggered if verification fails. It pauses the graph and prompts the user for the missing information. This is easily handled using LangGraph
interrupt()feature.
First, let’s define a Pydantic schema for parsing user input and a system prompt for an LLM to extract this information reliably.
from pydantic import BaseModel, Field

class UserInput(BaseModel):
    """Schema for parsing user-provided account information."""
    identifier: str = Field(description="Identifier, which can be a customer ID, email, or phone number.")

# Create a structured LLM that outputs responses conforming to the UserInput schema
structured_llm = llm.with_structured_output(schema=UserInput)

# System prompt for extracting customer identifier information
structured_system_prompt = """You are a customer service representative responsible for extracting customer identifier.
Only extract the customer's account information from the message history.
If they haven't provided the information yet, return an empty string for the identifier."""
The UserInput Pydantic model defines the expected data as a single identifier.
We use with_structured_output() to make the LLM return JSON in this format. A system prompt helps the LLM focus only on extracting the identifier.
Next, we need a helper function to take the extracted identifier (which could be a customer ID, phone number, or email) and look it up in our Chinook database to retrieve the actual customer_id.
from typing import Optional

# Helper function for customer identification
def get_customer_id_from_identifier(identifier: str) -> Optional[int]:
    """
    Retrieve Customer ID using an identifier, which can be a customer ID, email, or phone number.

    This function supports three types of identifiers:
    1. Direct customer ID (numeric string)
    2. Phone number (starts with '+')
    3. Email address (contains '@')

    Args:
        identifier (str): The identifier can be customer ID, email, or phone number.

    Returns:
        Optional[int]: The CustomerId if found, otherwise None.
    """
    # Check if identifier is a direct customer ID (numeric)
    if identifier.isdigit():
        return int(identifier)

    # Check if identifier is a phone number (starts with '+')
    elif identifier[0] == "+":
        query = f"SELECT CustomerId FROM Customer WHERE Phone = '{identifier}';"
        result = db.run(query)
        formatted_result = ast.literal_eval(result)
        if formatted_result:
            return formatted_result[0][0]

    # Check if identifier is an email address (contains '@')
    elif "@" in identifier:
        query = f"SELECT CustomerId FROM Customer WHERE Email = '{identifier}';"
        result = db.run(query)
        formatted_result = ast.literal_eval(result)
        if formatted_result:
            return formatted_result[0][0]

    # Return None if no match found
    return None
This utility function tries to interpret the provided identifier as a customer ID, phone number, or email, then queries the database to find the corresponding numeric CustomerId.
Now, we define our verify_info node. This node orchestrates the identifier extraction and verification process.
def verify_info(state: State, config: RunnableConfig):
    """
    Verify the customer's account by parsing their input and matching it with the database.

    This node handles customer identity verification as the first step in the support process.
    It extracts customer identifiers (ID, email, or phone) from user messages and validates
    them against the database.

    Args:
        state (State): Current state containing messages and potentially customer_id
        config (RunnableConfig): Configuration for the runnable execution

    Returns:
        dict: Updated state with customer_id if verified, or request for more info
    """
    # Only verify if customer_id is not already set
    if state.get("customer_id") is None:
        # System instructions for prompting customer verification
        system_instructions = """You are a music store agent, where you are trying to verify the customer identity
        as the first step of the customer support process.
        Only after their account is verified, you would be able to support them on resolving the issue.
        In order to verify their identity, one of their customer ID, email, or phone number needs to be provided.
        If the customer has not provided the information yet, please ask them for it.
        If they have provided the identifier but cannot be found, please ask them to revise it."""

        # Get the most recent user message
        user_input = state["messages"][-1]

        # Use structured LLM to parse customer identifier from the message
        parsed_info = structured_llm.invoke([SystemMessage(content=structured_system_prompt)] + [user_input])

        # Extract the identifier from parsed response
        identifier = parsed_info.identifier

        # Initialize customer_id as empty
        customer_id = ""

        # Attempt to find the customer ID using the provided identifier
        if (identifier):
            customer_id = get_customer_id_from_identifier(identifier)

        # If customer found, confirm verification and set customer_id in state
        if customer_id != "":
            intent_message = SystemMessage(
                content= f"Thank you for providing your information! I was able to verify your account with customer id {customer_id}."
            )
            return {
                  "customer_id": customer_id,
                  "messages" : [intent_message]
                  }
        else:
            # If customer not found, ask for correct information
            response = llm.invoke([SystemMessage(content=system_instructions)]+state['messages'])
            return {"messages": [response]}

    else:
        # Customer already verified, no action needed
        pass
So this verify_info node first checks if customer_id is already in the State. If not, it uses the structured_llm to extract an identifier from user_input and validates it with get_customer_id_from_identifier.
If valid, it updates the State and confirms with a message. If not, it uses the main LLM and system instructions to politely ask the user for their info.
Now, let’s create our human_input node. This node acts as a placeholder that triggers interrupt() in the graph, pausing execution to wait for user input. This is important for human-in-the-loop interactions, allowing the agent to directly request missing information.
from langgraph.types import interrupt

def human_input(state: State, config: RunnableConfig):
    """
    Human-in-the-loop node that interrupts the workflow to request user input.

    This node creates an interruption point in the workflow, allowing the system
    to pause and wait for human input before continuing. It's typically used
    for customer verification or when additional information is needed.

    Args:
        state (State): Current state containing messages and workflow data
        config (RunnableConfig): Configuration for the runnable execution

    Returns:
        dict: Updated state with the user's input message
    """
    # Interrupt the workflow and prompt for user input
    user_input = interrupt("Please provide input.")

    # Return the user input as a new message in the state
    return {"messages": [user_input]}
The interrupt() function is a powerful LangGraph feature. When executed, it pauses the graph's execution and signals that human intervention is required.
The run_graph function (which we will update later for evaluation) will need to handle this interrupt by providing new input to resume the graph.
Now, we just need to put this together. We define a new conditional edge (should_interrupt) that routes to the human_input node if the customer_id is not yet verified.
Otherwise, it allows the flow to continue to the main supervisor agent.
# Conditional edge: should_interrupt
def should_interrupt(state: State, config: RunnableConfig):
    """
    Determines whether the workflow should interrupt and ask for human input.

    If the customer_id is present in the state (meaning verification is complete),
    the workflow continues. Otherwise, it interrupts to get human input for verification.
    """
    if state.get("customer_id") is not None:
        return "continue" # Customer ID is verified, continue to the next step (supervisor)
    else:
        return "interrupt" # Customer ID is not verified, interrupt for human input
Now, let’s integrate these new nodes and edges into our overall graph:
# Create a new StateGraph instance for the multi-agent workflow with verification
multi_agent_verify = StateGraph(State)

# Add new nodes for customer verification and human interaction
multi_agent_verify.add_node("verify_info", verify_info)
multi_agent_verify.add_node("human_input", human_input)
# Add the existing supervisor agent as a node
multi_agent_verify.add_node("supervisor", supervisor_prebuilt)

# Define the graph's entry point: always start with information verification
multi_agent_verify.add_edge(START, "verify_info")

# Add a conditional edge from verify_info to decide whether to continue or interrupt
multi_agent_verify.add_conditional_edges(
    "verify_info",
    should_interrupt, # The function that checks if customer_id is verified
    {
        "continue": "supervisor", # If verified, proceed to the supervisor
        "interrupt": "human_input", # If not verified, interrupt for human input
    },
)
# After human input, always loop back to verify_info to re-attempt verification
multi_agent_verify.add_edge("human_input", "verify_info")
# After the supervisor completes its task, the workflow ends
multi_agent_verify.add_edge("supervisor", END)

# Compile the complete graph with checkpointer and long-term memory store
multi_agent_verify_graph = multi_agent_verify.compile(
    name="multi_agent_verify",
    checkpointer=checkpointer,
    store=in_memory_store
)

# Display the updated graph structure
show_graph(multi_agent_verify_graph)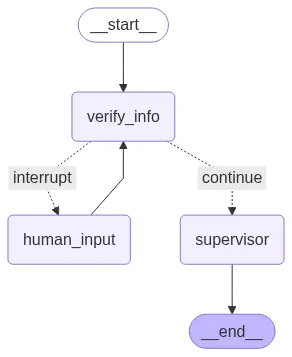
The new graph starts at verify_info. If verification succeeds, it moves to the supervisor. If not, it routes to human_input, which interrupts the flow and waits for user input.
Once input is provided, it loops back to verify_info to try again. The supervisor is the final processing step before reaching END. The show_graph function will visually display this verification loop.
Let’s test it out! First, we’ll ask a question without providing any identification.
thread_id = uuid.uuid4()
question = "How much was my most recent purchase?"
config = {"configurable": {"thread_id": thread_id}}

result = multi_agent_verify_graph.invoke({"messages": [HumanMessage(content=question)]}, config=config)
for message in result["messages"]:
    message.pretty_print()
### OUTPUT ###
======== Human Message =======
How much was my most recent purchase?
======== Ai Message ==========
Before I can look up your most recent purchase,
I need to verify your identity. Could you please provide your
customer ID, email, or phone number associated with your account?
This will help me to access your information and assist you
with your query.
As expected, the agent will interrupt and ask for your customer ID, email, or phone number because the customer_id is initially None in the state.
Now, let's resume the conversation and provide the requested information. LangGraph invoke method can accept a Command(resume=...) to pick up from an interrupt.
from langgraph.types import Command

# Resume from the interrupt, providing the phone number for verification
question = "My phone number is +55 (12) 3923-5555."
result = multi_agent_verify_graph.invoke(Command(resume=question), config=config)
for message in result["messages"]:
    message.pretty_print()
### OUTPUT ###
======= Human Message =========
How much was my most recent purchase?
=========== Ai Message =======
Before I can look up your most recent purchase, I need to verify your identity. Could you please provide your customer ID, email, or phone number associated with your account? This will help me to access your information and assist you with your query.
========== Human Message ===========
My phone number is +55 (12) 3923-5555.
============ System Message =======
Thank you for providing your information! I was able to verify your account with customer id 1.
========== Ai Message ==========<
Name: supervisor
{"type": "function", "function": {"name": "transfer_to_invoice_information_subagent", "parameters": {}}}
After the user provides their phone number, the verify_info node successfully identifies the customer_id (which is 1 for this number in the Chinook database).
It confirms the verification and, as defined in our graph, passes control to the supervisor, which then routes the original query.
This confirms that our human-in-the-loop verification mechanism works as intended!
A key advantage of LangGraph state management is that once customer_id is verified and saved in the State, it persists throughout the conversation.
This means the agent won’t ask for verification again in follow-up questions within the same thread.
Let’s test this persistence by asking a follow-up question without re-providing the ID:
question = "What albums do you have by the Rolling Stones?"
result = multi_agent_verify_graph.invoke({"messages": [HumanMessage(content=question)]}, config=config)
for message in result["messages"]:
    message.pretty_print()
### OUTPUT ###
=== Human Message ===
How much was my most recent purchase?
=== Ai Message ===
Before I can look up your most recent purchase, I need to verify your identity. Could you please provide your customer ID, email, or phone number associated with your account?
=== Human Message ===
My phone number is +55 (12) 3923-5555.
=== System Message ===
Thank you for providing your information! I was able to verify your account with customer id 1.
=== Ai Message ===
Name: supervisor
{"type": "function", "function": {"name": "transfer_to_invoice_information_subagent", "parameters": {}}}
=== Human Message ===
What albums do you have by the Rolling Stones?
=== Ai Message ===
Name: supervisor
{"type": "function", "function": {"name": "transfer_to_music_catalog_subagent", "parameters": {}}}
Notice that the verify_info node doesn't re-prompt for identification. Since state.get("customer_id") is already set to 1, it immediately moves to the supervisor, which routes the query to the music_catalog_subagent.
This shows how State maintains context and avoids repeating steps, improving the user experience.
We’ve already initialized our InMemoryStore for long-term memory in the “Setting up Short-Term and Long-Term Memory” section.

Now, it’s time to fully integrate it into our multi-agent workflow. Long-term memory is incredibly powerful because it allows the agent to recall and leverage information from past conversations, leading to more personalized and context-aware interactions over time.
In this step, we add two new nodes to handle long-term memory:
- load_memory retrieves the user’s existing preferences from the
in_memory_storeat the start of the conversation (after verification). - create_memory saves any new music interests shared by the user during the conversation to the
in_memory_storefor future use.
First, a helper function to format the user’s stored music preferences into a readable string that can be easily injected into an LLM’s prompt.
from langgraph.store.base import BaseStore

# Helper function to format user memory data for LLM prompts
def format_user_memory(user_data):
    """Formats music preferences from users, if available."""
    # Access the 'memory' key which holds the UserProfile object
    profile = user_data['memory']
    result = ""
    # Check if music_preferences attribute exists and is not empty
    if hasattr(profile, 'music_preferences') and profile.music_preferences:
        result += f"Music Preferences: {', '.join(profile.music_preferences)}"
    return result.strip()

# Node: load_memory
def load_memory(state: State, config: RunnableConfig, store: BaseStore):
    """
    Loads music preferences from the long-term memory store for a given user.

    This node fetches previously saved user preferences to provide context
    for the current conversation, enabling personalized responses.
    """
    # Get the user_id from the configurable part of the config
    # In our evaluation setup, we might pass user_id via config
    user_id = config["configurable"].get("user_id", state["customer_id"]) # Use customer_id if user_id not in config

    # Define the namespace and key for accessing memory in the store
    namespace = ("memory_profile", user_id)
    key = "user_memory"

    # Retrieve existing memory for the user
    existing_memory = store.get(namespace, key)
    formatted_memory = ""

    # Format the retrieved memory if it exists and has content
    if existing_memory and existing_memory.value:
        formatted_memory = format_user_memory(existing_memory.value)

    # Update the state with the loaded and formatted memory
    return {"loaded_memory": formatted_memory}
The load_memory node uses the user_id (from config or state) to build a namespace key and fetch existing user_memory from the in_memory_store.
It formats this memory and updates the loaded_memory field in the State. This memory is then included in the music_assistant prompt, as set up in generate_music_assistant_prompt.
Next, we need a Pydantic schema to structure the user’s profile for saving to memory.
# Pydantic model to define the structure of the user profile for memory storage
from pydantic import BaseModel, Field
from typing import List

class UserProfile(BaseModel):
    customer_id: str = Field(
        description="The customer ID of the customer"
    )
    music_preferences: List[str] = Field(
        description="The music preferences of the customer"
    )
Now, we define the create_memory node. This node will use an LLM-as-a-judge pattern to analyze the conversation history and existing memory, then update the UserProfile with any newly identified music interests.
# Prompt for the create_memory agent, guiding it to update user memory
create_memory_prompt = """You are an expert analyst that is observing a conversation that has taken place between a customer and a customer support assistant. The customer support assistant works for a digital music store, and has utilized a multi-agent team to answer the customer's request.
You are tasked with analyzing the conversation that has taken place between the customer and the customer support assistant, and updating the memory profile associated with the customer. The memory profile may be empty. If it's empty, you should create a new memory profile for the customer.

You specifically care about saving any music interest the customer has shared about themselves, particularly their music preferences to their memory profile.

To help you with this task, I have attached the conversation that has taken place between the customer and the customer support assistant below, as well as the existing memory profile associated with the customer that you should either update or create.

The customer's memory profile should have the following fields:
- customer_id: the customer ID of the customer
- music_preferences: the music preferences of the customer

These are the fields you should keep track of and update in the memory profile. If there has been no new information shared by the customer, you should not update the memory profile. It is completely okay if you do not have new information to update the memory profile with. In that case, just leave the values as they are.

*IMPORTANT INFORMATION BELOW*

The conversation between the customer and the customer support assistant that you should analyze is as follows:
{conversation}

The existing memory profile associated with the customer that you should either update or create based on the conversation is as follows:
{memory_profile}

Ensure your response is an object that has the following fields:
- customer_id: the customer ID of the customer
- music_preferences: the music preferences of the customer

For each key in the object, if there is no new information, do not update the value, just keep the value that is already there. If there is new information, update the value.

Take a deep breath and think carefully before responding.
"""
So we have define the memory prompt. Let’s create the memory node function.
# Node: create_memory
from langchain_core.messages import SystemMessage

def create_memory(state: State, config: RunnableConfig, store: BaseStore):
    """
    Analyzes conversation history and updates the user's long-term memory profile.

    This node extracts new music preferences shared by the customer during the
    conversation and persists them in the InMemoryStore for future interactions.
    """
    # Get the user_id from the configurable part of the config or from the state
    user_id = str(config["configurable"].get("user_id", state["customer_id"]))

    # Define the namespace and key for the memory profile
    namespace = ("memory_profile", user_id)
    key = "user_memory"

    # Retrieve the existing memory profile for the user
    existing_memory = store.get(namespace, key)

    # Format the existing memory for the LLM prompt
    formatted_memory = ""
    if existing_memory and existing_memory.value:
        existing_memory_dict = existing_memory.value
        # Ensure 'music_preferences' is treated as a list, even if it might be missing or None
        music_prefs = existing_memory_dict.get('music_preferences', [])
        if music_prefs:
            formatted_memory = f"Music Preferences: {', '.join(music_prefs)}"

    # Prepare the system message for the LLM to update memory
    formatted_system_message = SystemMessage(content=create_memory_prompt.format(
        conversation=state["messages"],
        memory_profile=formatted_memory
    ))

    # Invoke the LLM with the UserProfile schema to get structured updated memory
    updated_memory = llm.with_structured_output(UserProfile).invoke([formatted_system_message])

    # Store the updated memory profile
    store.put(namespace, key, {"memory": updated_memory})
The create_memory node retrieves the current user memory from the store, formats it, and sends it along with the full conversation (state["messages"]) to the LLM.
The LLM extracts new music preferences into a UserProfile object, merging them with existing data. The updated memory is then saved back to the in_memory_store using store.put().
Let’s integrate the memory nodes into our graph:
- The
load_memorynode runs right after verification to load user preferences. - The
create_memorynode runs just before the graph ends, saving any updates.
This make sure that memory is loaded at the start and saved at the end of each interaction.
multi_agent_final = StateGraph(State)

# Add all existing and new nodes to the graph
multi_agent_final.add_node("verify_info", verify_info)
multi_agent_final.add_node("human_input", human_input)
multi_agent_final.add_node("load_memory", load_memory)
multi_agent_final.add_node("supervisor", supervisor_prebuilt) # Our supervisor agent
multi_agent_final.add_node("create_memory", create_memory)

# Define the graph's entry point: always start with information verification
multi_agent_final.add_edge(START, "verify_info")

# Conditional routing after verification: interrupt if needed, else load memory
multi_agent_final.add_conditional_edges(
    "verify_info",
    should_interrupt, # Checks if customer_id is verified
    {
        "continue": "load_memory", # If verified, proceed to load long-term memory
        "interrupt": "human_input", # If not verified, interrupt for human input
    },
)
# After human input, loop back to verify_info
multi_agent_final.add_edge("human_input", "verify_info")
# After loading memory, pass control to the supervisor
multi_agent_final.add_edge("load_memory", "supervisor")
# After supervisor completes, save any new memory
multi_agent_final.add_edge("supervisor", "create_memory")
# After creating/updating memory, the workflow ends
multi_agent_final.add_edge("create_memory", END)

# Compile the final graph with all components
multi_agent_final_graph = multi_agent_final.compile(
    name="multi_agent_verify",
    checkpointer=checkpointer,
    store=in_memory_store
)

# Display the complete graph structure
show_graph(multi_agent_final_graph)
Our Long memory integrated agent visuals is this:
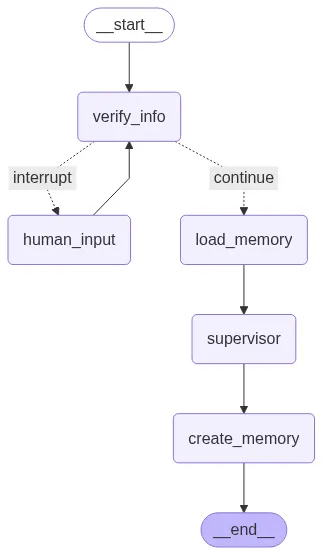
The show_graph output now shows the complete, sophisticated workflow: START -> verify_info (with a loop to human_input if needed) -> load_memory -> supervisor (which internally orchestrates sub-agents) -> create_memory -> END.
This architecture combines verification, multi-agent routing, and long-term personalization.
Let’s test this fully integrated graph! We will give it a complex query, including an identifier for verification and a music preference to be saved.
thread_id = uuid.uuid4()

question = "My phone number is +55 (12) 3923-5555. How much was my most recent purchase? What albums do you have by the Rolling Stones?"
config = {"configurable": {"thread_id": thread_id}}

result = multi_agent_final_graph.invoke({"messages": [HumanMessage(content=question)]}, config=config)
for message in result["messages"]:
    message.pretty_print()
=== Human Message ===
My phone number is +55 (12) 3923-5555. How much was my most recent purchase? What albums do you have by the Rolling Stones?
=== System Message ===
Thank you for providing your information! I was able to verify your account with customer id 1.
=== Ai Message ===
Name: supervisor
Tool Calls:
transfer_to_invoice_information_subagent
=== Tool Message ===
Name: transfer_to_invoice_information_subagent
Successfully transferred to invoice_information_subagent
=== Ai Message ===
Name: invoice_information_subagent
Your most recent purchase was on August 7, 2025, and the total amount was $8.91. I am unable to provide information about albums by the Rolling Stones. Would you like to search for something else?
=== Ai Message ===
Name: invoice_information_subagent
Tool Calls:
transfer_back_to_supervisor
=== Tool Message ===
Name: transfer_back_to_supervisor
Successfully transferred back to supervisor
=== Ai Message ===
Name: supervisor
Tool Calls:
transfer_to_music_catalog_subagent
=== Tool Message ===
Name: transfer_to_music_catalog_subagent
Successfully transferred to music_catalog_subagent
=== Ai Message ===
The Rolling Stones have several albums available, including "Hot Rocks, 1964-1971 (Disc 1)", "No Security", and "Voodoo Lounge". Would you like to explore more music or purchase one of these albums?
=== Ai Message ===
Name: music_catalog_subagent
Tool Calls:
transfer_back_to_supervisor
=== Tool Message ===
Name: transfer_back_to_supervisor
Successfully transferred back to supervisor
=== Ai Message ===
Name: supervisor
Is there anything else I can help you with?
This interaction shows the full flow:
- Verification:
verify_infoextracts the phone number, getscustomer_id = 1, and updates the state. - Load Memory:
load_memoryruns next. Since it's likely the first session, it loads "None". - Supervisor Routing: The supervisor routes the query to
invoice_information_subagentandmusic_catalog_subagentas needed. - Create Memory: After the response about “The Rolling Stones”
create_memoryanalyzes the conversation, identifies the artist as a new preference, and saves it to thein_memory_storeforcustomer_id = 1.
This flow is purely showing how long term memory is gettinh handled by our agent, but infact we take a look at the memory.
We can directly access our in_memory_store to check if the music preference was saved.
user_id = "1" # Assuming customer ID 1 was used in the previous interaction
namespace = ("memory_profile", user_id)
memory = in_memory_store.get(namespace, "user_memory")

# Access the UserProfile object stored under the "memory" key
saved_music_preferences = memory.value.get("memory").music_preferences

print(saved_music_preferences)
### OUTPUT ###
['Rolling Stones']
The output ['Rolling Stones'] confirms that our create_memory node successfully extracted and saved the user's music preference to long-term memory.
In future interactions, this information can be loaded by load_memory to provide even more personalized responses.
Evaluations help you measure how well your agents perform, which is critical because LLM behavior can vary with even small prompt or model changes. Evaluations give you a structured way to catch failures, compare versions, and improve reliability.
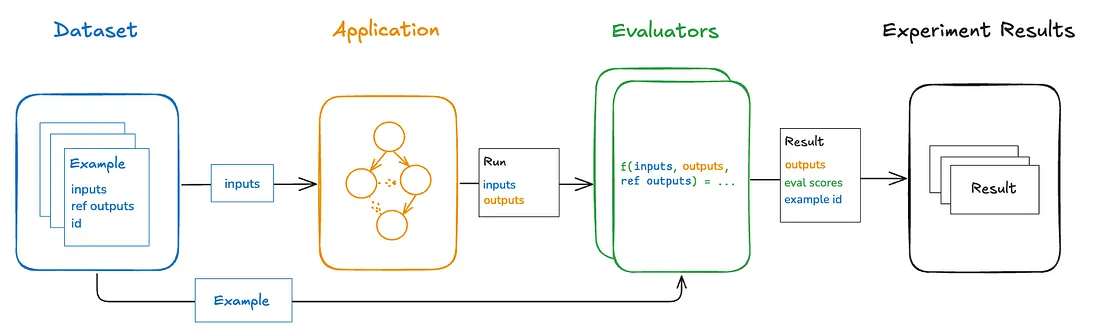
Evaluations consist of 3 parts:
- Dataset: A set of test inputs and expected outputs.
- Target function: The app or agent you’re testing; it takes inputs and returns outputs.
- Evaluators: Tools that score the agent’s outputs.
And some Common Agent Evaluation Types:
- Final Response: Check if the agent gave the correct final answer.
- Single Step: Evaluate one step (e.g. was the right tool chosen?).
- Trajectory: Evaluate the full reasoning path the agent took to reach the answer.
One of the most straightforward ways to evaluate an agent is to assess its overall performance on a task.
This is like treating the agent as a “black box” and simply evaluating whether or not its final response successfully addresses the user’s query and meets the expected criteria.
- Input: The user’s initial query.
- Output: The agent’s final generated response.
First, we need a dataset of questions and their corresponding expected (ground truth) final responses. This dataset will serve as the benchmark for our evaluation. We’ll use the langsmith.Client to create and upload this dataset.
from langsmith import Client

client = Client()

# Define example questions and their expected final responses for evaluation
examples = [
    {
        "question": "My name is Aaron Mitchell. My number associated with my account is +1 (204) 452-6452. I am trying to find the invoice number for my most recent song purchase. Could you help me with it?",
        "response": "The Invoice ID of your most recent purchase was 342.",
    },
    {
        "question": "I'd like a refund.",
        "response": "I need additional information to help you with the refund. Could you please provide your customer identifier so that we can fetch your purchase history?",
    },
    {
        "question": "Who recorded Wish You Were Here again?",
        "response": "Wish You Were Here is an album by Pink Floyd", # Note: The model might return more details, but this is the core expected fact.
    },
    {
        "question": "What albums do you have by Coldplay?",
        "response": "There are no Coldplay albums available in our catalog at the moment.",
    },
]

dataset_name = "LangGraph 101 Multi-Agent: Final Response"

# Check if the dataset already exists to avoid recreation errors
if not client.has_dataset(dataset_name=dataset_name):
    dataset = client.create_dataset(dataset_name=dataset_name)
    client.create_examples(
        inputs=[{"question": ex["question"]} for ex in examples],
        outputs=[{"response": ex["response"]} for ex in examples],
        dataset_id=dataset.id
    )
Now we defines four example scenarios, each with a question (the input to our agent) and an expected response (what we consider a correct final output).
It then creates a dataset in LangSmith and populates it with these examples.
Next, we define a target function that encapsulates how our agent (multi_agent_final_graph) should be run for evaluation.
This function will take the question from our dataset as input and return the agent’s final generated response.
import uuid
from langgraph.types import Command

graph = multi_agent_final_graph

async def run_graph(inputs: dict):
    """
    Run the multi-agent graph workflow and return the final response.

    This function handles the complete workflow including:
    1. Initial invocation with user question
    2. Handling human-in-the-loop interruption for customer verification
    3. Resuming with customer ID to complete the request

    Args:
        inputs (dict): Dictionary containing the user's question

    Returns:
        dict: Dictionary containing the final response from the agent
    """
    # Create a unique thread ID for this conversation session
    thread_id = uuid.uuid4()
    configuration = {"configurable": {"thread_id": thread_id, "user_id": "10"}}

    # Initial invocation of the graph with the user's question
    # This will trigger the verification process and likely hit the interrupt
    result = await graph.ainvoke({
        "messages": [{"role": "user", "content": inputs['question']}]
    }, config=configuration)

    # Resume from the human-in-the-loop interrupt by providing customer ID
    # This allows the workflow to continue past the verification step
    result = await graph.ainvoke(
        Command(resume="My customer ID is 10"),
        config={"configurable": {"thread_id": thread_id, "user_id": "10"}}
    )

    # Return the final response content from the last message
    return {"response": result['messages'][-1].content}
Now, let’s define how to run our graph. Note that we must continue past the interrupt() by supplying a Command(resume="") to the graph.
from openevals.llm import create_llm_as_judge
from openevals.prompts import CORRECTNESS_PROMPT

# Using Open Eval pre-built
correctness_evaluator = create_llm_as_judge(
    prompt=CORRECTNESS_PROMPT,
    feedback_key="correctness",
    judge=llm
)
We can also define our own evaluator too, like this.
from typing import TypedDict, Annotated
from langchain_core.messages import SystemMessage, HumanMessage

# Custom definition of LLM-as-judge instructions
grader_instructions = """You are a teacher grading a quiz.

You will be given a QUESTION, the GROUND TRUTH (correct) RESPONSE, and the STUDENT RESPONSE.

Here is the grade criteria to follow:
(1) Grade the student responses based ONLY on their factual accuracy relative to the ground truth answer.
(2) Ensure that the student response does not contain any conflicting statements.
(3) It is OK if the student response contains more information than the ground truth response, as long as it is factually accurate relative to the ground truth response.

Correctness:
True means that the student's response meets all of the criteria.
False means that the student's response does not meet all of the criteria.

Explain your reasoning in a step-by-step manner to ensure your reasoning and conclusion are correct."""

# LLM-as-judge output schema
class Grade(TypedDict):
    """Compare the expected and actual answers and grade the actual answer."""
    reasoning: Annotated[str, ..., "Explain your reasoning for whether the actual response is correct or not."]
    is_correct: Annotated[bool, ..., "True if the student response is mostly or exactly correct, otherwise False."]

# Judge LLM
grader_llm = llm.with_structured_output(Grade, method="json_schema", strict=True)

# Evaluator function
async def final_answer_correct(inputs: dict, outputs: dict, reference_outputs: dict) -> bool:
    """Evaluate if the final response is equivalent to reference response."""
    # Note that we assume the outputs has a 'response' dictionary. We'll need to make sure
    # that the target function we define includes this key.
    user = f"""QUESTION: {inputs['question']}
    GROUND TRUTH RESPONSE: {reference_outputs['response']}
    STUDENT RESPONSE: {outputs['response']}"""

    grade = await grader_llm.ainvoke([SystemMessage(content=grader_instructions), HumanMessage(content=user)])
    return grade["is_correct"]
We can use LLM as a judge to between our ground truth and our ai agent response. Now that we have compile each and everything, let’s run the evaluation.
# Run the evaluation experiment
# This will test our multi-agent graph against the dataset using both evaluators
experiment_results = await client.aevaluate(
    run_graph,                                    # The application function to evaluate
    data=dataset_name,                           # Dataset containing test questions and expected responses
    evaluators=[final_answer_correct, correctness_evaluator],  # List of evaluators to assess performance
    experiment_prefix="agent-result",       # Prefix for organizing experiment results in LangSmith
    num_repetitions=1,                           # Number of times to run each test case
    max_concurrency=5,                           # Maximum number of concurrent evaluations
)
When you run this command and the evaluation completes, it will output the LangSmith dashboard page containing our results. Let’s check that out.
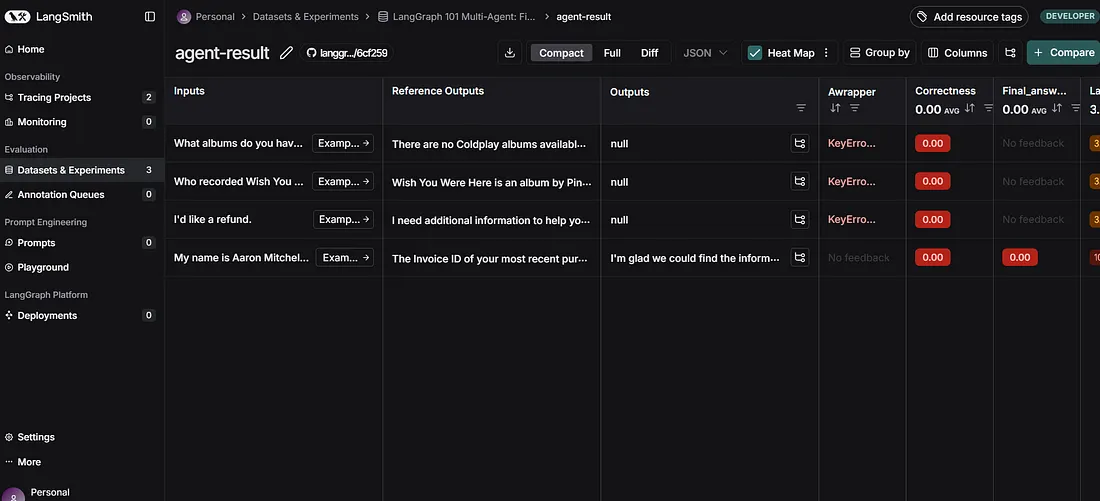
Our LangSmith dashboard contains the results of our evaluation, showing parameters such as correctness, final results, their comparison, and more.
There are other evaluation techniques are also can be used which you can find in the notebook in more detailed, make sure to check them out!
So far, we’ve built a multi-agent system using the Supervisor approach, where a central agent manages the flow and delegates tasks to sub-agents.
An alternative is the Swarm Architecture, as described in the LangGraph docs. In a swarm, agents collaborate and pass tasks directly among themselves, without a central coordinator.
In the github notebook, you can find the swarm architecture also but take a look at comparison between swarm and supervisor.
| Feature | Supervisor | Swarm |
|---|---|---|
| Control Flow | Centralized; a primary agent directs traffic. | Decentralized; agents collaborate and hand off tasks directly. |
| Hierarchy | Hierarchical; a "boss" agent delegates to sub-agents. | Peer-to-peer; no central authority. |
| Predictability | More predictable and structured path. | Adaptive and dynamic collaboration. |
| Resilience | Control typically returns to the supervisor. | Potentially more resilient due to direct agent collaboration. |