This is a simple demonstration of some aspects of https://tools.ietf.org/html/rfc6749 and https://tools.ietf.org/html/rfc7662.
In this demo, we are developing:
- OAuth 2.0 Authorization Server
- Two resource servers
- One client app that is accessing resources from both resource servers.
Make sure you have docker and docker-compose installed from https://docs.docker.com/install/ and https://docs.docker.com/compose/install/.
We will have 4 docker-compose's yml files to create 4 "separate machines": one Auth Server, two Resource Servers and one Client App.
Create .env file and put this content:
DOCKER_0_HOST=

OAUTH2_SERVER_POSTGRES_EXTERNAL_PORT=5433
OAUTH2_SERVER_POSTGRES_USER=postgres
OAUTH2_SERVER_POSTGRES_PASSWORD=
OAUTH2_SERVER_WEB_EXTERNAL_PORT=8000

RESOURCE_SERVER_1_WEB_EXTERNAL_PORT=8001
RESOURCE_SERVER_2_WEB_EXTERNAL_PORT=8002

CLIENT_APP_ID=
CLIENT_APP_SECRET=
CLIENT_APP_WEB_EXTERNAL_PORT=8003
You can customize the values later.
There are still 3 values unfilled.
DOCKER_0_HOST should be filled with the IP address of docker0. You can get the
IP address of docker0 using the ifconfig command.
You will fill the values for CLIENT_APP_ID and CLIENT_APP_SECRET later when you created the application data on the Auth Server.
Build the container:
$ docker-compose -f docker-compose-oauth2.yml build
Prepare initial data and create an admin user of the Auth User:
$ docker-compose -f docker-compose-oauth2.yml run --rm oauth2_server ./migrate_data.sh
$ docker-compose -f docker-compose-oauth2.yml run --rm oauth2_server ./create_superuser.sh
Run the Auth Server:
$ docker-compose -f docker-compose-oauth2.yml up
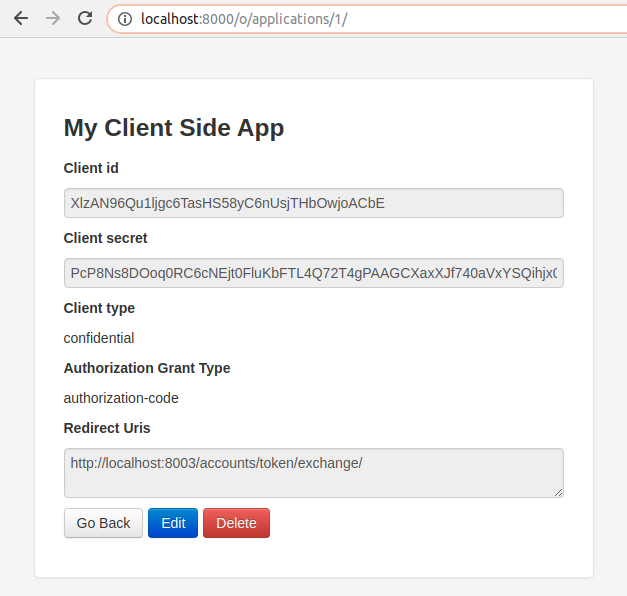
Now that the Auth Server is up, you can add clients to it. Let's add one client and use the generate keys to fill
CLIENT_ID and CLIENT_SECRET in the .env file:
- Open http://localhost:8000/o/applications/register/. If you are asked to login, please use the admin account you have just created.
- Enter the
Namefield with anything you want. Client typeisConfidential.Authorization grant typeisAuthorization code.Redirect urisishttp://localhost:8003/auth/token/exchange/.
Once successful, the generated Client ID and Client Secret will be displayed:
run the containers:
$ docker-compose -f docker-compose-resource-1.yml up
$ docker-compose -f docker-compose-resource-2.yml up
Build the container and prepare session storage:
$ docker-compose -f docker-compose-client.yml build
$ docker-compose -f docker-compose-client.yml run --rm client_app ./migrate_data.sh
Run the container:
$ docker-compose -f docker-compose-client.yml up
Create another user of the Auth Server that represent a user that is using the Client App:
- Open http://localhost:8000/admin/auth/user/add/. If you are asked to login, please use the admin username that you have created before.
- Fill the username and password fields. Let's call this new user as
user1. - Logout from the admin account.
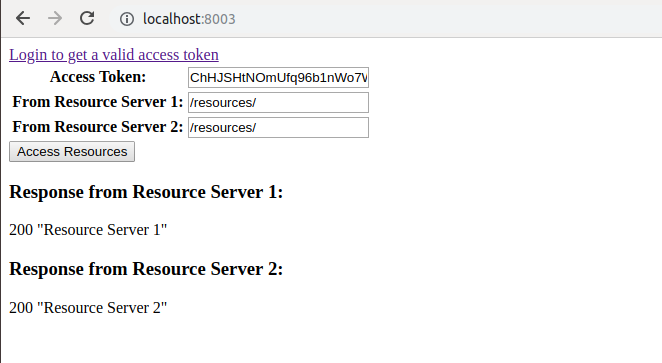
- Open the Client App at http://localhost:8003/. The
Access Tokenshould still be empty. - Click
Login to get a valid access token. You will be asked to login. Please login with the username and password ofuser1. - Authorization page will be displayed. Click
Authorize. - The browser should now be redirected back to the demo page at http://localhost:8003/.
- Now the
Access Tokenfield is filled with a valid value. - Click
Access Resources. If you see "Resource Server 1" and "Resource Server 2" texts are displayed, it means resources are successfully loaded from the two Resource Servers.
You can now do some experiments by changing or removing value of access token.