
Share the healing sense of touch with loved ones, from anywhere.

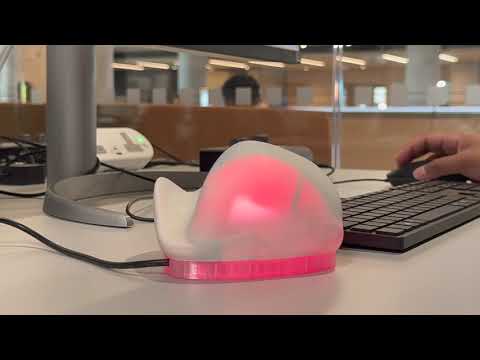
HotStone is a prototype device that allows two users to bond over a shared experience of warmth across the distance. It is primarily aimed at users who, for one reason or another, find themselves in a long-distance relationship / friendship with another person or family member. Utilizing Internet-of-Things (IoT) technology, it is possible to create an interaction where one user putting their hand on their device creates a warm sensation for the other person when they touch the other paired device and vice versa.
There have been a number of attempts to create devices that connect people over the miles, such as Frebble by Frederic Petrignani. However, we believe we are the first to successfully demonstrate a prototype device that is able to transfer warmth to another user over the internet.
Demo video (Youtube link):
To reproduce this project, users will need to first set up PlatformIO on VS Code. Once the user has the software directory on their local machine, and opened on PlatformIO, the register, and calibration process can begin. Within the include directory, create a file named macAddr.h this file can maintain the unique MAC addresses of the partner devices, as well as the unique threshold value for the capacitive sensor. This file will require the following format:
#pragma once

#include <stdint.h>

#define DEVICE_B

#ifdef DEVICE_A   // Device B Address
   static const uint8_t MAC_ADDR_LIST[] = {0x01, 0x02, 0x03, 0x04, 0x05, 0x06};
   static const uint8_t DEVICE_THRESHOLD = xxx;

#endif
#ifdef DEVICE_B   // Device A Address
   static const uint8_t MAC_ADDR_LIST[] = {0x07, 0x08, 0x09, 0x10, 0x11, 0x12};
   static const uint8_t DEVICE_THRESHOLD = xxx;
#endif
For each device the user will need to find their unique MAC Address and replace the values within the above arrays. This can be done by running using the following script on your device:
uint8_t baseMac[6];
esp_err_t ret = esp_wifi_get_mac(WIFI_IF_STA, baseMac);
if (ret == ESP_OK) {
  Serial.printf("%02x:%02x:%02x:%02x:%02x:%02x\n",
                baseMac[0], baseMac[1], baseMac[2],
                baseMac[3], baseMac[4], baseMac[5]);
} else {
  Serial.println("Failed to read MAC address");
}
Once the MAC addresses have been set, we can set the threshold values. With the device plugged into a computer, open the serial port monitor, and place your hand on the device. The serial port should print out the capacitive values. Select a sensible value between the capacitive values when the hand is not on the device, as opposed to the values after the hand has been placed on the device. This value will replace the xxx within the macAddr.h file. With this code flashed on both devices, the user is ready to use the device normally.
- Adafruit NeoPixel: to Adjust colors
- Capacitive Sensor: to Register a Users Touch
Once the user has saved the MAC Address and capacitive touch threshold value, flash the code to the microcontroller in PlatformIO.
You will need the following materials for this build:
- A 3D printer and filament
- Protoboard or stripboard for the circuit prototype build
- Wire
- FQP30N06L MOSFET
- 220K Ohm resistor
- Aluminium foil
- 8-LED Neopixel LED strip
- USB male cable
- Node MCU
- Pin headers (male and female)
- Heating pads, available on Amazon from multiple sources

The 3D models for the enclosure can be found in Modeling/3D_models. Use these to print out a copy of the enclosure to house the electronics in. We recommend printing the top shell of the enclosure in a solid material and the bottom part in translucent to allow the LED light to diffuse out.
You can adapt the 3D models to fit any protoboard size and configuration, but for the easiest solution, we recommend taking dimensions from the dummy protoboard in the 3D model files.
The circuit diagram for the device is shown below:

As well as the schematic for the layout of the protoboard:

Using these, it is possible to reconstruct the arrangement shown below, by soldering the heating pads, header pins for the Node MCU and the MOSFET transistor to the protoboard:


Power is supplied to the device using the USB cable, stripped and connected to the relevant power in and ground pins of the Node MCU (the thick wire leading out to the right):

The Neopixel strip is not soldered on but rather attached to a fixed position facing up and connected to the circuit via wire jacks and pin headers.
Note that the IMU was replaced by a capative sensor for a more natural human interaction, using the Capacitive Sensor arduino library.
The main code in software/hotstone/src/main.cpp describes which pins the capacitive sensor should be soldered to. A 220k Ohm resistor was used for this sub-circuit (tested with an ESP8266) and aluminium foil was used for the sesnor plate, but these can be adjusted to your liking:

More information on capacitive sensor circuits can be found on the web, such as this Instructables link.
- Further study into material selection
- Further study into NiChrome Wire as a heating element
- Convert prototype board to PCB
- Convert ESP-NOW to WiFi
- Add QR Code or NFC tag to link users to a page to add WiFi details or add multiple devices to the network
Please reach out to the developers of this project, or add an issue to this repo.
Vineeth Kirandumkara: @vineethk96
Ethan Low: @ethmacc
Donghao Zhang: @wudaozhiying1
Yue Zhu: @XLunaXX07