A Jupyter widget for annotating images with bounding boxes. Try a live demo on Binder.
from jupyter_bbox_widget import BBoxWidget
widget = BBoxWidget(
    image='fruit.jpg',
    classes=['apple', 'orange', 'pear'],
)
widget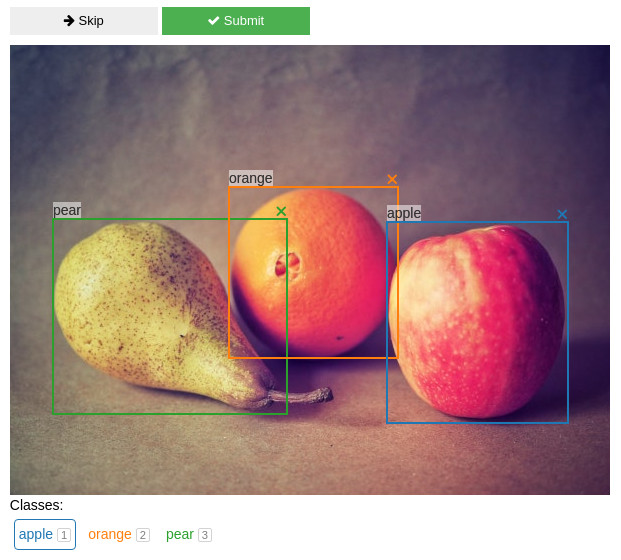
Create, edit, move, resize and delete bounding box annotations using the mouse.
Use widget.bboxes to get current annotations values:
widget.bboxes
# [{'x': 377, 'y': 177, 'width': 181, 'height': 201, 'label': 'apple'},
#  {'x': 219, 'y': 142, 'width': 169, 'height': 171, 'label': 'orange'},
#  {'x': 43,  'y': 174, 'width': 234, 'height': 195, 'label': 'pear'}]
You can also assign to widget.bboxes to display any annotations. For example, use the output of an object detection model to do model-assisted labeling.
widget.bboxes = [
    {'x': 377, 'y': 177, 'width': 181, 'height': 201, 'label': 'apple'},
    {'x': 219, 'y': 142, 'width': 169, 'height': 171, 'label': 'orange'},
    {'x': 43,  'y': 174, 'width': 234, 'height': 195, 'label': 'pear'}
]
Fruit photo by Umanoide on Unsplash
You can install using pip:
pip install jupyter_bbox_widgetA Jupyter server restart may be necessary for the widget to be properly discovered.
- click and drag to create a bbox
- click and drag corners or edges to resize a bbox
- click and drag inside a bbox to move it
- in order to change a label select a new label below the image and click on label text
When you click inside the widget area it will gain focus and start receiving keyboard events. An outline usually indicates that the element is focused. Normal Jupyter keyboard shortcuts won't work in this state. To unfocus the widget area click outside it or press Esc.
Some shortcuts act on the selected bbox. New bboxes are selected automatically when created. You can also select a bbox by clicking on it. Selected bbox is displayed on top of others and with a thicker border.
- Digit keys 1-9 and 0 select a class label.
Escunfocuses the widgetEnteris the same as pressing Submit buttonSpaceis the same as pressing Skip buttonTab/Shift-Tabselect next/previous bbox.- Keys acting on the selected bbox (assuming a QWERTY keyboard, other layouts should use any keys in the same locations):
Wmove upAmove leftSmove downDmove rightQshrink widthEgrow widthRgrow heightFshrink heightCassign selected class label- Holding
Shiftwhile pressing movement keys will increase step size
You can define functions that will be called automatically when you press Skip or Submit buttons. This is useful for creating a workflow for annotating multiple images.
@widget.on_skip
def skip():
    # move on to the next image

@widget.on_submit
def save():
    # do stuff to save current annotations and move on
There is an example of a simple annotation workflow in examples/introduction.ipynb notebook.
Get or set widget state by using these traits.
image- path to a local image file or a web linkbboxes- list of bounding boxesclasses- list of class labelscolors- list of colors to use for different classeslabel- currently selected class labelselected_index- index of currently selected bbox. Is-1when nothing is selected.hide_buttons- default False, remove Skip and Submit buttonsview_only- default False, make bboxes non-editable. This is useful for viewing annotation outputs without accidentally changing them.image_bytes- binary data from the image file
It's also possible to react to state changes by using the widget's observe method. For example, the following code will make the function on_bbox_change run every time the user edits bounding boxes:
def on_bbox_change(change):
    new_bboxes = change['new']
    # do whatever with them

widget.observe(on_bbox_change, names=['bboxes'])Maybe your images aren't files in a common format or require special handling to load. One way to show them is to save the image into an in-memory bytes buffer and feed that to widget.image_bytes. I'm open to suggestions on how to make this more user-friendly.
from io import BytesIO
bytes_io = BytesIO()
# for example, say img is a PIL image
img.save(bytes_io, format='png')
# feed that data to the widget
widget.image_bytes = bytes_io.getvalue()Sometimes you need to record more info about an object than just a location and a class label. For example, you might want to specify whether the object is in focus or blurred, record its size or other properties.
Let's say we want to apply a rating on a scale from 1 to 5 to every object in the image. We create a slider widget to edit the rating values:
w_rating = widgets.IntSlider(value=3, min=1, max=5, description='Rating')And we attach it to the bbox widget.
widget.attach(w_rating, name='rating')As a result all bboxes created afterwards will have a rating property and the w_rating widget can be used to display and manipulate the rating of the currently selected bbox.
Any number and any kind of ipywidgets widgets may be used in this way for creating richer annotations - number inputs, text inputs, checkboxes and so on (see widget list).
The notebook in examples/introduction.ipynb has an example and a more detailed explanation of this feature.
- v0.6.0
- rewritten to use
anywidgetunder the hood - improved the way images are sent to frontend - it's no longer necessary to base64-encode local files in order to show them in Jupyter Lab
- rewritten to use
- v0.5.0
- enabled use of
widget.on_skipandwidget.on_submitmethods as decorators
- enabled use of
- v0.4.0
- exposed selected class label to the python side as
widget.label
- exposed selected class label to the python side as
- v0.3.4
- set max-width: 100% on image so that it respects layout
- v0.3.3
- fixed bboxes not updating after class change by keyboard shortcut
- v0.3.2
- added
hide_buttonsoption - fixed bbox delete icon not displayed properly
- added
- v0.3.1
- unselect a bbox on click outside in view only mode
- fixed a bug with overwriting attached properties on unselect
- v0.3.0
- added
view_onlymode
- added
- v0.2.0
- added Skip and Submit buttons
- added attach widget functionality for recording extra properties
- multiple fixes and improvements
- v0.1.0
- initial release
This project was originally inspired by a blogpost Creating Reactive Jupyter Widgets With Svelte but is currently based on anywidget which provides a very nice developer experience.
Follow the steps below to make changes to this widget.
- Clone the repo, cd into its folder
- Activate the python environment you will use
- Install the python package with dev dependencies
pip install -e .[dev] - Run
npm installto install JS dependencies. - Run
npm run devto launch vite dev server. It will watch for any changes you make to the files insveltefolder. - In
src/jupyter_bbox_widget/bbox.pychange theDEVvariable toTrueso that the widget gets its JS code from the vite dev server. - Launch jupyter lab with
ANYWIDGET_HMR=1 jupyter labto turn on anywidget's hot module reloading. - Open a notebook with the widget and have fun making changes - you should see them in the UI as soon as you save a file.
- Run
hatch buildto build your widget when it's ready.